How to Create Bunting Banners in UE5 - A Guide to Faking Cloth & Rope
- Victoria Lyons
- Feb 11, 2024
- 14 min read

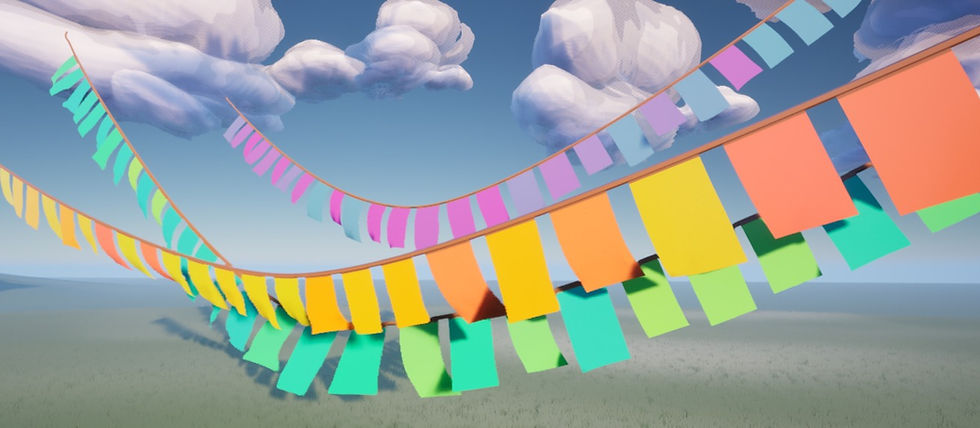
Recently I created this environment as a small scale art / performance test for a game I’m working on.
The bunting used in the background here was super fun to create, and I’d thought I’d share a tutorial for my approach to it. I plan on doing multiple articles and tutorials for both other portions of this environment as well as future portions of this project.
Banner Wind Movement
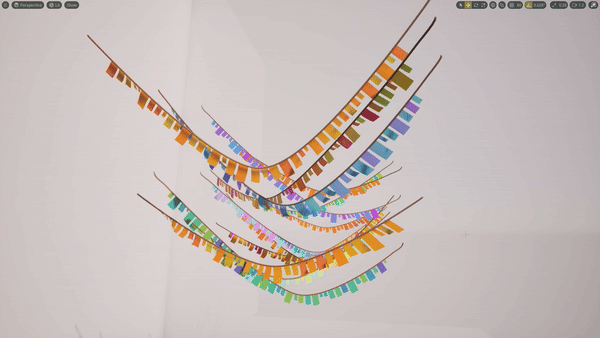
Banner Splines in a Blockout Environment:

(Not an actual gameplay environment. I made this blockout just to demo a scene with more banners for you)

Guide Overview
UE Versions
Valid for both UE4 and UE5
Guide Difficulty
Heads up!!! This is not an exact step by step tutorial and requires some UE experience!
Blueprint Level - Beginner-ish & No C++ required
Material Level - Intermediate & No HLSL required
My Approach
What I’m about to show here is by no means the only approach to doing this. I made it this way because it matched my requirements for this game, but there are other ways to do similar things.
Here's what I chose, why, and what some alternatives are if your project has different requirements than mine.
My Requirements & Tradeoffs
1.No Tick
I decided these actors should never have physics enabled on them, nor should they ever tick. All movement should be vertex shader based only.
2.Environment Dependent
The game has dynamic weather. The banners had to be able to respond to different wind variables - including strength and direction.
3.Versatile Use but No Unique Assets
I planned on using these all over the game, so the ropes needed to be able to be variable lengths, have controllable banner distributions + color, and - very importantly - had to have either end of the rope sitting at different heights - but while avoiding unique meshes for every instance. I wanted nothing here to to get baked down into new assets.
Trade Offs
The big tradeoff here with meeting these requirements is that a lot more is getting thrown at our vertex shader. I would not recommend this on anything that has to have nanite enabled, nor would I recommend it for anything super high-poly in general. If you are using it on something high-poly though, LODs and cutting off world position offset (aka what controls your vertex shader) are going to be really important. Be sure to check out the WPO optimization section at the end here.
Considerations For You
Anyway, if you’re not worried about these requirements, here’s your alternatives
If you’re not worried about CPU time and/or need rope physics…
You’re in the wrong place! What you’re actually looking for is a cable component. Luckily this is much simpler to set up and there are already many tutorials out there on this!

If you’re not worried about variable heights / lengths…
You could be in the right place, and some of this will be similar, but this exact solution may be more involved than you need. I’d recommend PrismaticaDev's "Cloth Sim" video for a similar thing instead
Making The Blueprint
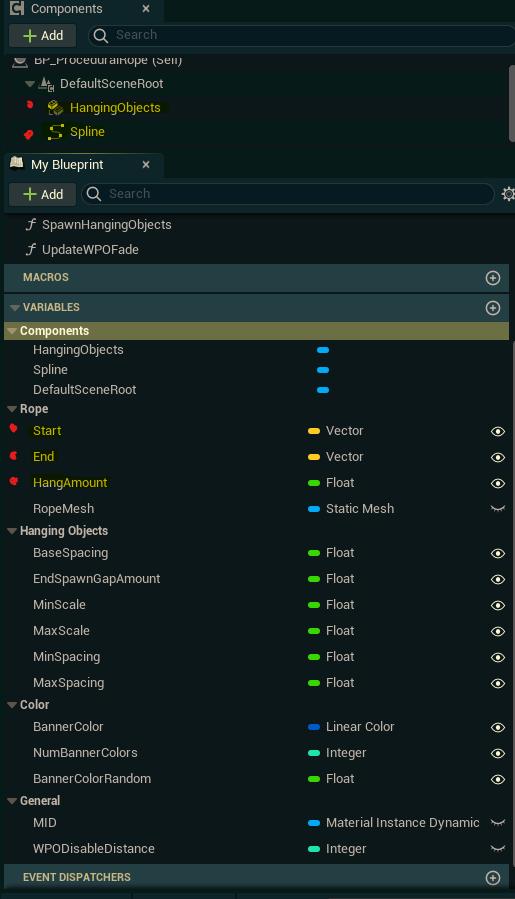
The blueprint portion of this is fairly straightforward if you’ve created spline BP’s before and is nothing but a few things in the construction script. The blueprint has a spline component, the rope mesh is placed as spline meshes, and then the banners are placed on it as HISM instances.
If you haven't made a spline BP before, the spline component is essentially just the easiest way to get a spline function in Unreal. You can find the documentation for it here.
This is everything in the blueprint:

The one weird thing here really is that rather than the user defining all points of the spline, the spline is generated based on only two points - one to represent the start of the rope and one to represent the end of the rope.
Blueprint Setup
Components
1 spline component + one HISM component for the banners
Important Variables
StartPosition & EndPosition
Make sure to expose these. This will give you two handy gizmos in editor that can be dragged around to determine the start and end points of a rope.
HangAmount
How far the rope should hang in cm
Everything else exposed in editor is mostly for customizing how the banners spawn
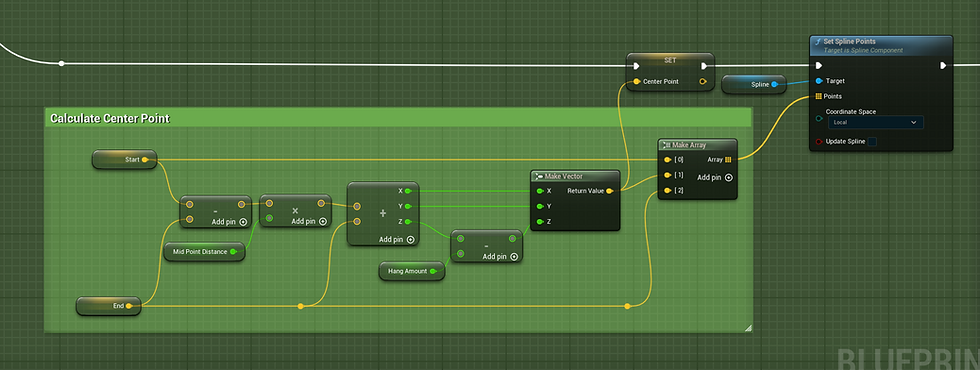
SetupSpline()
Here is where the spline points and tangents are set. The start and end locations each become a spline point location, then a third point is generated between them to represent the bottom of the rope.

Intuitively, you might think this third spline point should be in the center between the two rope ends. This is actually what I did at first - find the point exactly between the start and end, subtract the rope hang amount from Z, and that’s the center point.

But, this only looks fine when our two points are at the same height. Otherwise it starts to look a little silly. Instead, we want the “middle” point that hangs down to slowly shift to whichever side is lower - like real rope would.

That variable MidPointDistance is for the purpose. It’s a 0-1 value used to scale how far along the vector going between the rope ends the rope middle should be placed. It’s determined by the ratio of the total change in height between Start and End to how much distance is covered.
(I also clamped it so the middle point is never exactly under either end. Just because that looks odd)
And here's what that left to right shifting of the middle point looks like

Once the spline points are set, their tangents also need to be set.
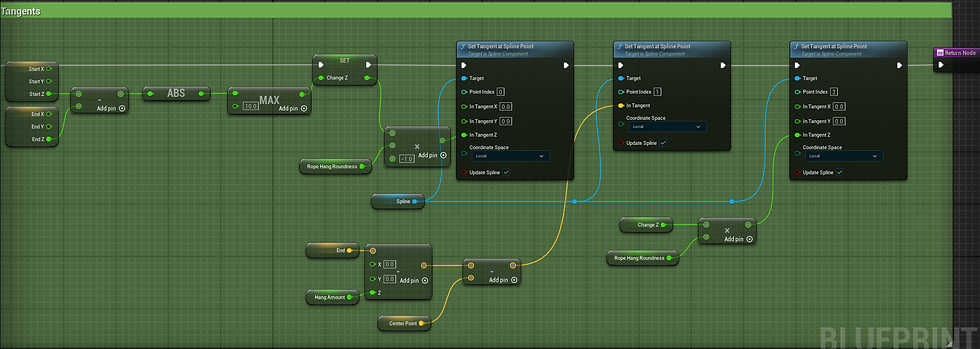
Start - Tangent points directly down
Middle - Tangent points in the direction from the center point to a point below the end
End - Tangent points directly up
The curve of the hanging rope should be more rounded when the rope is not hanging very far down, and sharper when it is. To get this, the length of the tangents at the rope ends + how far down the point the middle point’s tangent “points to” are scaled by HangAmount + an arbitrary RopeHangRoundness.
Here's what RopeHangRoundness = 0.3 looks like compared to RopeHangRoundness = 20 - (Just for visualization purposes, a number as high as 20 should really never be used)

CreateMID()
Once the spline is generated, this method is just there to actually create the MID (dynamic material instance) that will be used for both the rope and banners.
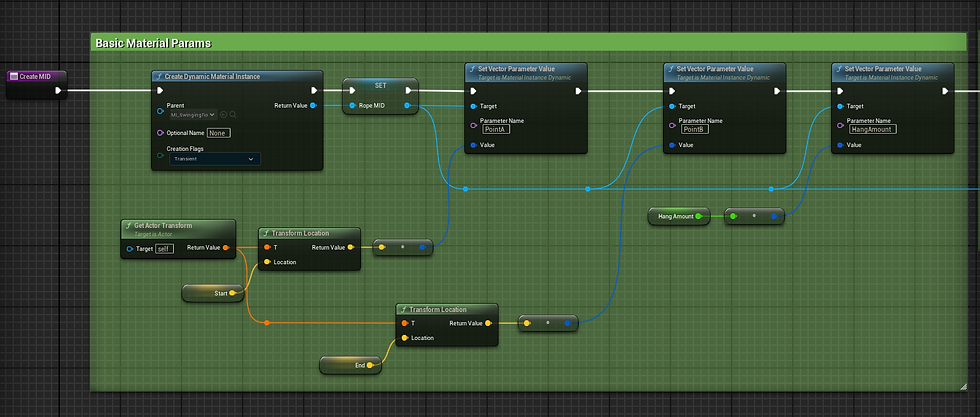
A lot of calculations in the material are based off the start and end points. I decided to go ahead and switch them to world space to make this much easier for myself.

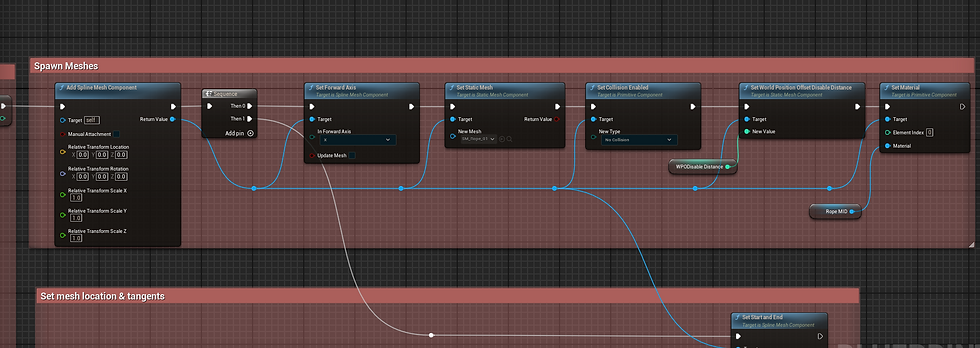
CreateRopeMesh()
Now the rope mesh is actually generated. I wanted make sure the rope went all the way from the start to end without any gaps on either side, so I actually opted to slightly stretch the existing rope meshes when there wasn’t enough room to fit a whole new mesh.
Technically this means not all instances of the actor in the world have the same tri density by a small amount, so be careful about using this on longer meshes.


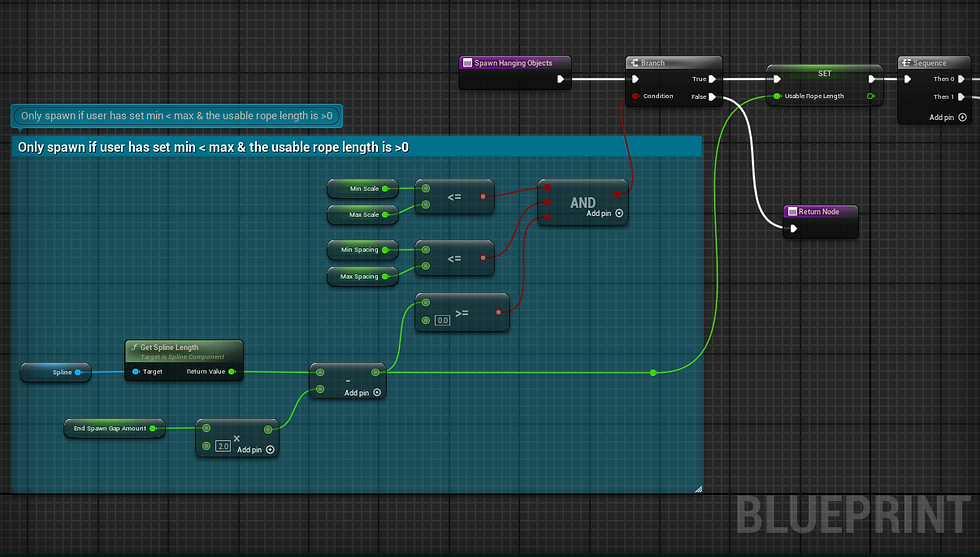
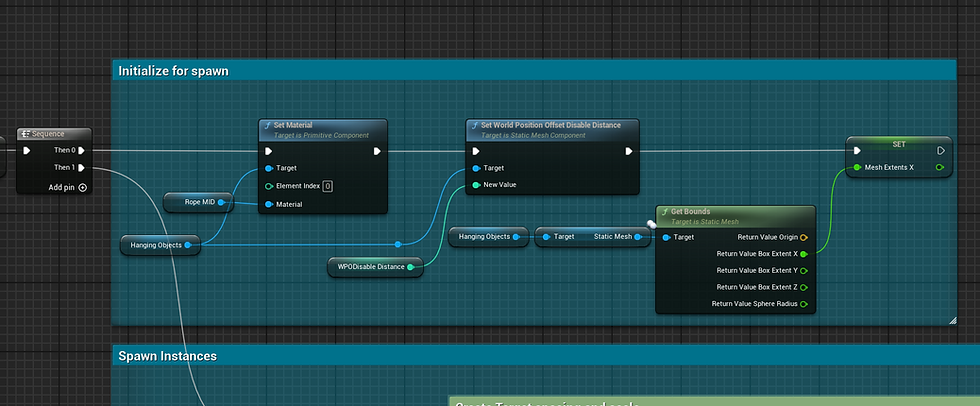
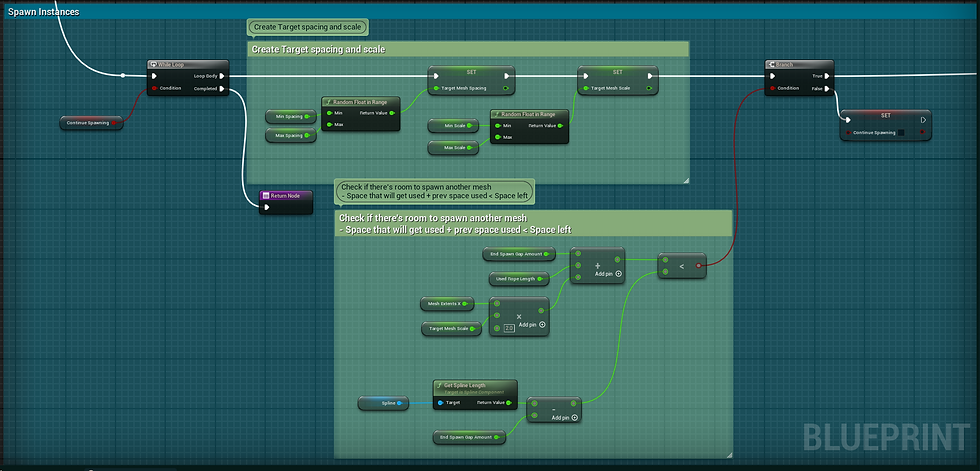
SpawnHangingObjects()
After the rope is spawned along the spline, the banners are created as instances of the HISM component.
For this I wanted to be able to:
1 - Have random scaling + spacing while always preventing banner overlap
2- Define dead zones at either end of the banner
The dead zones are so banners don’t spawn all the way up to the end of the rope.
This is useful when the rope end goes up against a solid surface that I don’t want banners randomly clipping through

Doing this is fairly straightforward. The method:
Picks random scales and random spacing,
Adds a banner if there’s space left on the rope for it - Accounting for the potential bounds of the mesh + length it needs to leave at the start and end
Repeats until it’s out of usable rope space


If you don’t care about having the option to randomize things, the simpler option here would be to just spawn the HISM instances by a constant banners per meter. Most tutorials for spawning meshes on a spline will do this, so I'd suggest referring to those instead.
Making The Meshes
Now to the actual meshes spawned with this blueprint. Here are the two meshes I used. The banner is a plane that’s been subdivided and the rope is just a cylinder with the ends cut off.

The more tris the banner has, the better the vertex animation is going to look, but I’d recommend keeping it as low as you can visually get away with. I’d also recommend making your own LOD(s) here because for planes it only takes a second and auto-generated LODs for them can be particularly bad.
This is what I used:
(Tris are the in-engine number, not the Blender number)
LOD 0 - 208 tris - (Screen size 1.0)
LOD 1 - 32 tris - (Screen size 0.75)
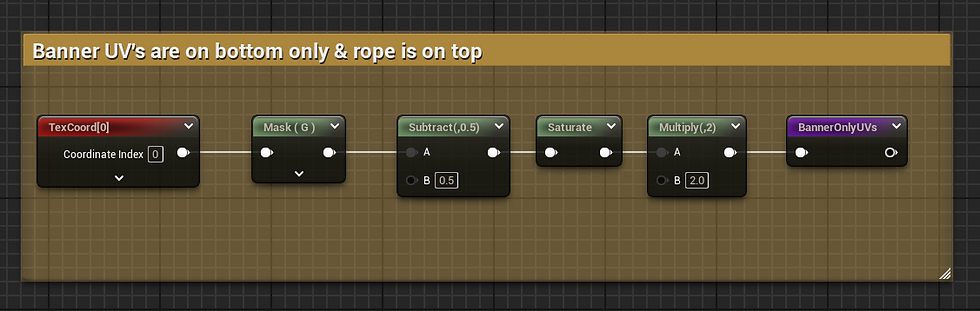
The most important thing here though is how these meshes are UV’d. To avoid relying on vertex color or textures, I just set my meshes up so that may texture coordinates can determine how much an object drags in the wind.
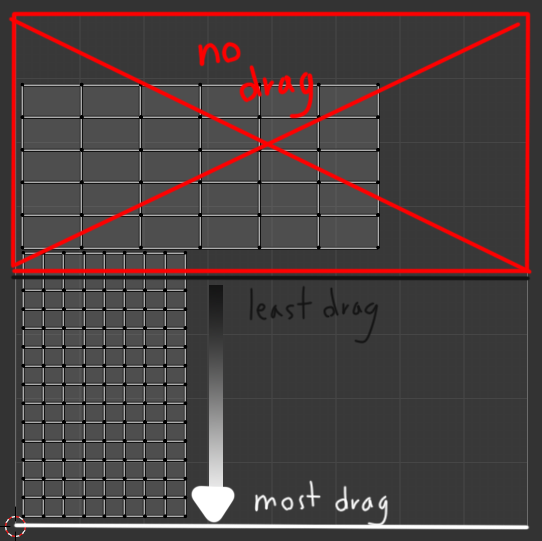
Anything with a V coordinate less than 0.5 does not drag in the wind (the rope and top of the very banner), then after that anything where V = 0.5 to 1.0 is used as a gradient that determines how much drag there should be.
Making The Material
General Rotation Info
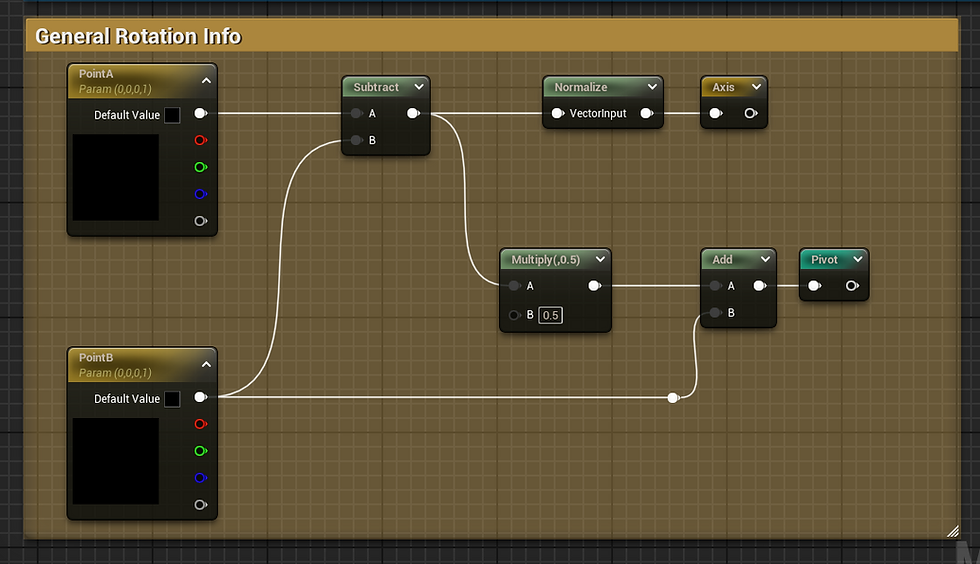
Let's start with the reroute nodes used in several places. As set up in the blueprint, points A and B are the world space locations of either end of the rope. We’ll need both of those points, but also the normalized vector going between them, and the center point between them for several calculations. Both of these are put into named reroute nodes to use later.
World Position Offset - Overview
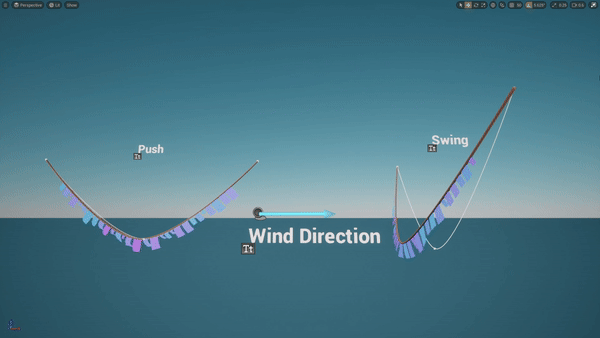
The WPO calculations are the most involved part of this material. There are 3 types of motion I wanted for the ropes
1-Swinging Motion
If the wind is going in the direction the banners face, it should start to swing them up and around like there’s tension on the rope.
2- Pushing Motion
If the wind is pushing the banners from the side though, it should not rotate anything, but actually just scoot everything in that direction.
3 - Panning Noise
This is only for medium scalability or higher, but this is movement from the global panning wind texture. This is the same material function being translated over the grass in the world and adding it just looks nice + adds cohesion to the different objects in the scene.
All of the WPO is a combination of these 3 movements. The base movement lerps between the rope swing and the directional push based on similarity to the wind direction to the axis of the banner. I use an absolute value of the dot product though because the undulating movement is the same whether the wind is directly in front or directly behind the banner.
There’s also a minimum rope swing amount though, just because no swing at all looks a bit unnatural and real wind physics never looks that perfect.

The extra panning wind is normally in a material function with some additional weirdness to allow the wind direction to change at runtime. To isolate it from the weather system for this guide though, I've copied this gist of it over to this graph.
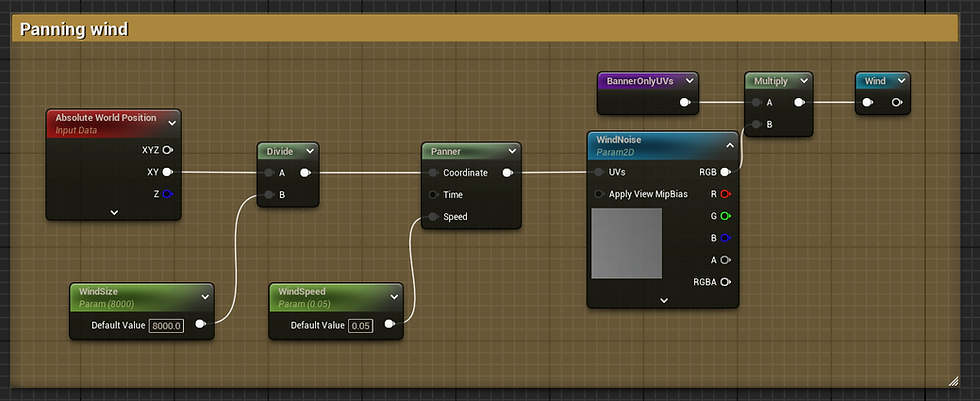
Honestly a lot of different textures could be used for this, but I used this wiggly nonsense in Designer for mine.

World Position Offset - Directional Push
Let’s start with creating the directional push movement.
Not all of the rope should be pushed the same amount. I wanted to fake that the rope is secured to two points. To do this, there's 2 different masks involved.
Mask By Proximity to Wind Impact Point
First, I created a mask for that point’s proximity to the area most impacted by the wind. For example, if the wind were coming from B, the area that would be pushed the most should be the rope closest to A. Similarly if the wind were coming form A’s direction, B should be the most impacted.

To get the approximate point most affected by the wind, we get the dot product of the wind direction to the axis, remap that to 0-1, then use that to lerp between all the way at A’s XY coordinates to all the way to B’s XY coordinates.
I then created a mask over the whole rope by using each positions distance to the point most impacted, and scaling that by the total length of the rope to put it in the 0-1 range of a mask.

A power node is thrown in at the end for artistic direction with controlling this falloff, but this is optional.
Note: Keep in mind here that for my weather system, WindDirection is 2D only.
Mask By Proximity to a Secure Point
While the first mask accounts for wind direction, the next major factor here is how far down on the rope a point is. Obviously parts of the rope up near points A and B shouldn’t move nearly as much as the bottom of the rope getting pushed around.
Masking for this would be simple if A and B were at the same height. We could just find the distance from the top of the actor, and use it to create a mask. With this actor though, technically one of the end points could be really low down and we don’t want one of the rope ends to be wiggling about. A different approach is needed.
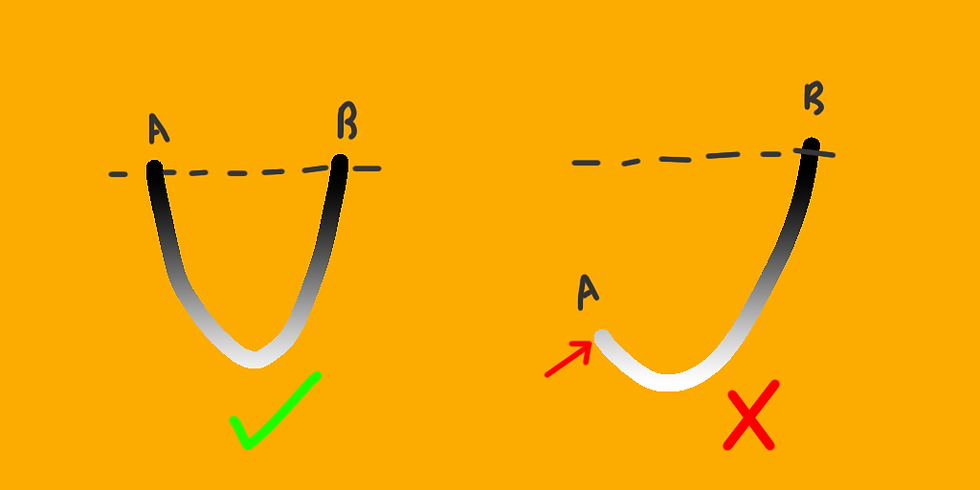
Instead of masking based on absolute Z position, I needed to mask based on distance to the hypothetical axis between A and B. That way both A and B are completely still, and points move more the further they are away from both.
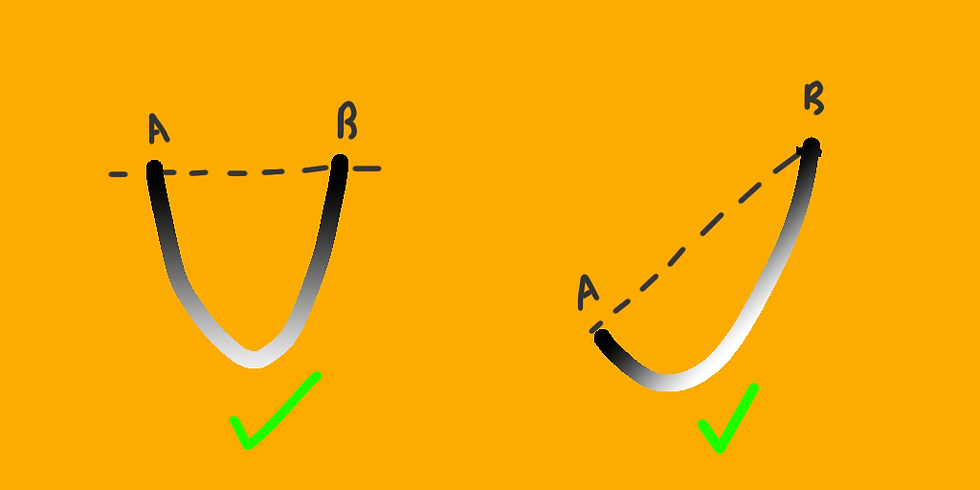
This set of nodes is for finding that - creating an approximate mask based on distance to this axis

Here's an actual breakdown of the math here
1- Get the vector going from B to world position
2 - Project to this to find how far along that axis our world position is
3- Our axis is already a normal vector, so we can multiply that distance by the axis to get the actual vector along our axis from B that corresponds to where we want to measure from
4 - This vector is a direction + distance from B, but doesn't actually give us a position. Add that to B to get an actual world space location for this point on the axis
5 - For the sake of simplicity, we then find the distance in the Z direction only. Subtract this point's Z from our mesh’s Z to get an approximate distance from the axis
6 - Remap that to a 0-1 mask by dividing by the furthest distance something could possibly be - the hang amount
Again, I also threw in a power just to art direct the falloff here. That could be removed though.
Adding Force
Finally, once we have these 2 masks we can multiply them together into one mask and use them to drive the pushing force itself.
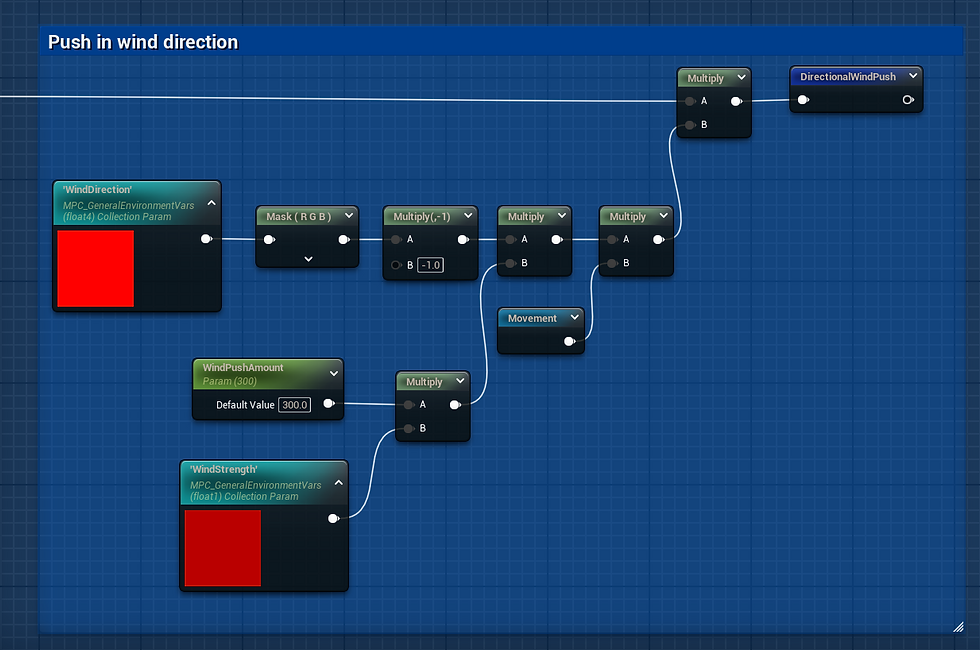
The offset here is based on the direction of the wind, by a set wind push amount, and all scaled based on a wind strength param driven by the game’s weather system.
This is then scaled by the movement output - which I will cover in a moment, but for now just know it’s a -1 to 1 sine wave over time with some extra falloff nonsense to make banners move individually.
World Position Offset - Rope Swing
The rotation movement is a bit easier than the directional pushing movement because of UE’s built in RotateAboutAxis node. The only things we need to provide here is the axis it’s rotating on - the vector between A and B, the pivot point - the point exactly between A and B, and the rotation angle.

The one thing changing is the rotation angle. It’s an exposed RopeSwingAmount, scaled by the weather system’s wind strength, and then animated with the same movement used for the directional wind push.
World Position Offset - Movement
Ultimately, the reroute node Movement I used in the last two sections is just a sine wave where time is used as an input.
The actual speed of this wave is controlled by a constant MovementSpeed that’s also scaled by wind speed of the weather system. Everything else added here is to make that movement for both the swinging and pushing motion look organic and turbulent.
Adding Organic Movement 1 - Per Actor Variation
First off, we don’t want all of the ropes beside each other to move exactly in sync. To solve this, the world position of each actor is used in a sine wave to add some variation to each.
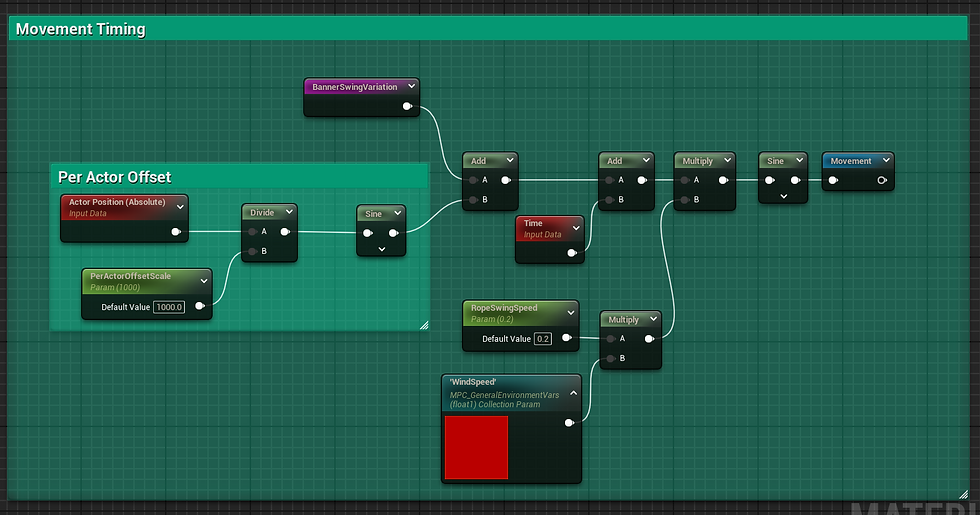
Adding Organic Movement 2- Banner Drag
The second type of variation here is with the banners themselves. Because of how the meshes are UV’d, the V coordinate can be used to create drag in the wind on each of the banners.

BannerOnlyUV’s isolate the relevant mask for this. Everything below G = 0.5 shouldn’t move at all, so this just cuts out those values and remaps the remaining 0.5-1.0 range that should move to 0 - 1.
Pushing this too far can start to stretch the meshes, so controls are added for the Falloff and overall drag intensity as well.
Adding Organic Movement 2- Banner Drag Variation
The result already looks alright, but for more organic movement, not every banner and each portion of each banner should move exactly in sync with each other. This excessive consistency can be especially noticeable in strong winds.
To create some variation here, PerInstanceRandom + a low res noise are used to offset the time input of a sine wave that’s been remapped to 0-1. The noise from this sine is then used to scale the overall drag on the banner.
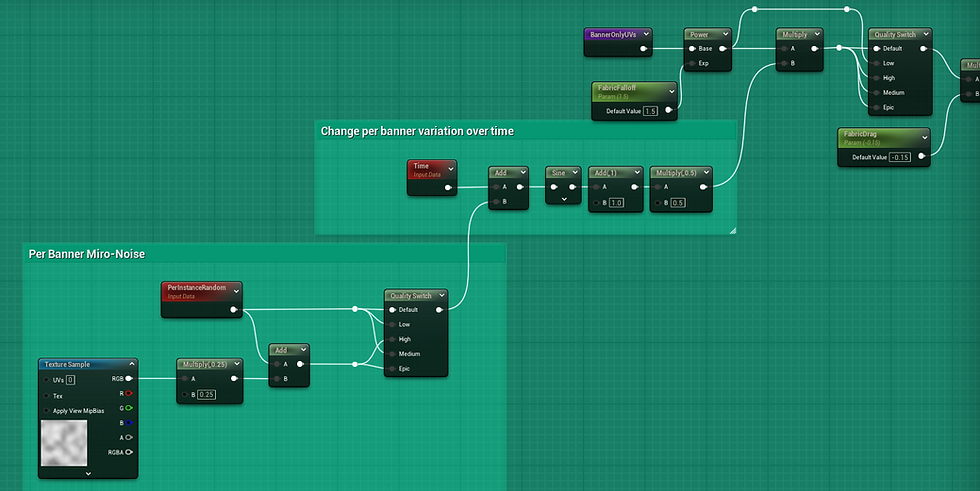
I realize this means I’m using another sine wave and sampling a texture just to create little fabric ripples, so I also chose to lock some of this behind quality switches. Variation per a banner is only used on medium or higher and variation on the surface of individual banners is only used on High settings or higher.
World Position Offset - Important Optimization
Finally, we’ve got the right look for the banners. But, there’s one optimization left that's still really important here. As you may likely know if you’ve ever made master foliage materials, WPO can get out of hand really quickly when used all over a map. The passes the cost shows up in depend on your project settings, but in general if we don’t need it - it’s usually best to disable it.
There’s two ways to disable it at a distance
1- Let the LOD disable it
The messy way to do this sometimes is to put a different material instance on LOD 1+ than LOD 0. One that’s simpler but about the same color. It works sometimes, especially for flat colored things, but can also make the jump between LOD’s a bit more noticeable. Not to mention, it requires another MI and makes materials more annoying to update.
2 - Use WPO Disable Distance + A WPO Fade Function
You may have already noticed this in the BP screenshots, but this is what I did for this actor. When being created, both the rope and the banners have their WPO disable distance set by the same variable. That distance is then also fed into the created MID to be used in the material. In the material it can help control fading out the final WPO before it's shut off at a distance.


Important Note:
Setting the disable distance on the actual mesh components is super important here. Otherwise WPO will still be evaluated, and you’ll still see it blowing up the GPU visualizer, even if it’s zero. Also keep in mind this optimization can be done not just on spline mesh components or HISM components, but on anything that inherits from UStaticMeshComponent as well as foliage types.
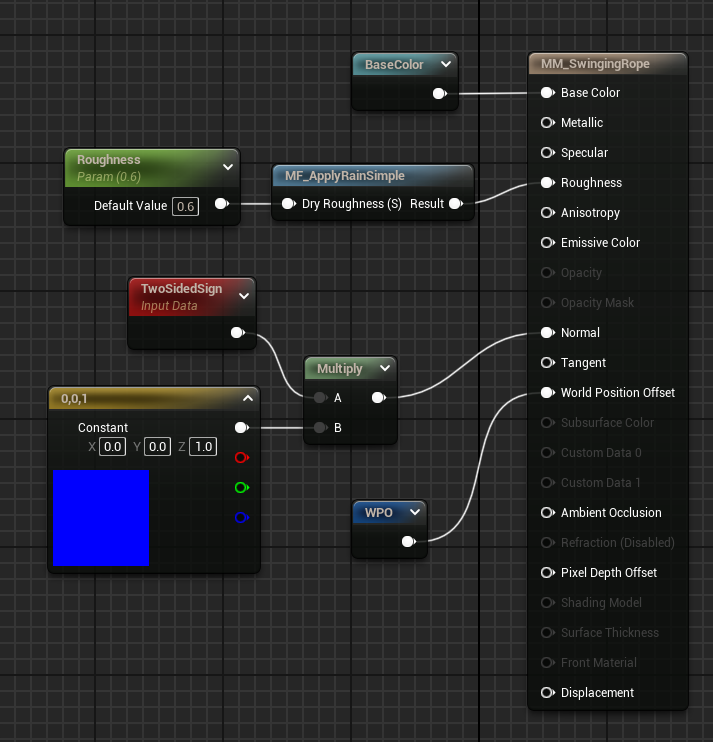
Base Color
Finally, there’s base color. It’s a lot simpler than the WPO. As described before, the UV’s/Texture Coordinates are used to differentiate banner from rope. For the color, anything where G < 0.5 becomes the rope color and anything where G > 0.5 is the banner color.

Because the banners are spawned in a HISM, we can use the PerInstanceRandom to get a random 0-1 value for each instance and split that into the number of banner colors needed.
To get varying degrees of hue randomness from this, this is then used as the percentage of a hue shift where BannerColorRandomness is used to scale the per instance random value
Final Notes
That’s it! That’s the guide! I hope you liked it.


If you used this guide to help with your projects, I’d love to see what you made! Additionally, if you have any suggestions, please let me know. I can always make edits to it.
You can find my social media links on my about page or use the form on my contact page to send me an email.

Comments